
How To Create Your Own Minecraft Themed Party!
Mojang™’s game Minecraft™ is such a craze for kids right now and it’s the perfect theme for a birthday party! This year we put together our own DIY Minecraft party for a 10 year old. The great (and easy) thing about Minecraft is that it's based around squares, so using our square products as a starting point and then adding a Minecraft theme to them was so simple. Here I've put together all the things I did in preparation for the party to inspire and help you to create your very own Minecraft party!

The Cake
A Minecraft cake is a must at any Minecraft party, and this one I made was simple and very effective!
Here's what I used :
- Gluten Free packaged cake and frosting mix
- Lime Green
- Emerald Green
- Chocolate Brown
- Flesh
- Light brown
- Teal Turquoise
- Duck Egg Blue
- Wilton® White Decorating Gel
- Build a Birthday’s Square Cake tin
- Red Licorice (with printed TNT labels)
Tools:
- Grid cutting mat (I used a craft one)
- Pizza Cutter
You may forego the mat and pizza cutter if you wish, as we now stock a Square Cookie Cutter Set which makes the process of creating fondant squares much easier.
I had never used fondant before so I was pleasantly surprised at how easy it was to create not only the grass block effect but the figures too!
To start, I rolled out the Emerald Green fondant on the cutting mat. Then I cut 2x2cm squares. The trick with fondant is to work quickly to keep it soft and mouldable. I then repeated the process with the light green, brown, light brown and skin colour for the top and the sides of the grass block, then placed the squares in the design I wanted (measured to the size of the cake tin) and transferred them onto baking paper to store in an airtight container.
Again, we now stock a Square Cookie Cutter Set so this process can be now simplified to just rolling out the fondant and using the cookie cutters to create the squares.


Next for the figurines! I used some Minecraft figures to copy (and used the axe). Again working quickly with the fondant;


I used Wilton White Decorating Gel for the whites of the eyes, and chocolate icing and a toothpick for the creeper face.
The cake was about half the depth of the cake tin and after we had baked it, we then iced it with frosting before adding the fondant.


I used toothpicks to hold the figures up.
The TNT was made from 9 pieces of raspberry licorice, stuck together with a bit of icing sugar and water, then wrapped in the printed TNT label.
Finally, with the leftover fondant, I whipped up a quick pig, then the birthday boy added the finishing touch; The Studio Workshop’s Minecraft inspired candles!
The finished result!

Cake Pops
Cake pops are always a favorite, and so quick and easy to make. I made these a week in advance, and froze them. Freezing the cake pops makes them easy to dip and helps the sticks stay in place.
What I Used:
- Gluten free packaged vanilla cupcake & frosting mix
- Wilton® Lollipop Sticks
- Wilton® Vibrant Green Candy Melts
- Wilton ® Black Colour Mist
- Build a Birthday’s Square Silicone Mould
- Cardboard with cutout creeper face.
- Olive Oil
First I baked the cupcake mix in a cake tin, cut it and let it cool. Once cooled, I crumbled the cake into a fine breadcrumb consistency. Next I added the frosting gradually until the mixture had a dough like feel.
Next, I pressed the mixture into the square silicone mould. The great thing about this silicone mould is that when I popped the squares out, they came out easily and maintained their shape!
Once all of the mixture was in squares, I stuck in lollipop sticks, lay the pops on baking paper in a container and froze.


On the day of the party I melted the Vibrant Green Candy Melts in the microwave, then added olive oil until they were a good dipping consistency.
I dipped the pops until covered, then stood them in polystyrene to set.

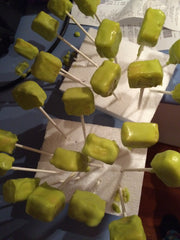
Once set, I used a stencil I hade made with cardboard, and stenciled the pops with the Wilton Black Colour Mist to create a creeper face! I then left to dry.


I then covered the polystyrene in wrapping paper as a cake pop holder ready for the party table!
Cupcakes
We just made simple cupcakes, using Paper Eskimo Apple Green and Black Stripes cupcake papers. These were topped with green and blue icing and a custom printed Minecraft image. To make the icing I made a simple buttercream icing and then added Wilton Icing Colour Concentrated Gel
These would look great on a Black Cupcake Stand too!

Partyware
The party table was set on a Green Grass table cover which was perfect for setting the Minecraft scene! We used Forest Green serving platters for the meal and lime green square plates for the cake. On the lime green plates, we just used duct tape to cut out and stick on a creeper face.


We used mini milk bottles for drinks, with The Studio Workshop's black square stickers to make Creeper and Enderman faces. For the purple on the enderman, I just used purple paper with double sided tape. We served Coke in the Enderman bottles, and lime Raro in the Creepers to match the colours, and it worked great! The Studio Workshops purple, black and green stripes paper straws also tied in with the colours perfectly and the white milk crate added the finishing touch.
The Studio Workshop's Bamboo Paper Straws are also great for the Minecraft Theme.
Wooden spoons for the cake worked well too, as the boys pointed out, crafting from wood is a part of the game!
For the food table, we used the green grass table cover again, along with the lime green square plates. We printed food labels and found matching food to serve. We used clear plastic shot glasses for jelly, and made them 'buckets' of slime, water and lava, a big favorite of the day!

Party Favors
At the start of the party, each boy was given an empty treat box. We used red treat boxes with printed TNT labels on the front and the boy's names on the back. throughout the party the boys filled their boxes with prizes and goodies. The prizes included, minecraft silicone bracelets, bubbles (with printed minecraft characters stuck on them) laser finger beams, key rings and of course, lollies and chocolate!


Decorations
We used the leftover lime, emerald green and black streamers from the pinata, plus some grey to create a 'portal' on the front door. This was so easy to make and a bold statement for the entrance-way.


For the birthday banner, we printed the pieces, and then strung them on some Black Satin Cord.
The balloons we used were the minecraft coloured balloons, plus some lime green and age 10 balloons. On the lime green balloons we used duct tape again to create Creeper faces. We made bouquets of two balloons on balloon weights and let the creepers roam free! Of course we had to have a few air filled balloons on the letter box as well. We used helium and Hi-Float in the balloons so the boys were able to take 3 home each and they lasted well into the next weekend!


Games and activities
We used the Minecraft theme to make our own games to play. We made a 'pin the tail on the pig' using coloured paper - which the boys loved! Pinatas are also a huge hit at parties, so I made a pull string pinata using boxes and coloured streamers and filled it with goodies.


An activity which went down very well was the make-your-own keyrings. We set up a treasure hunt for the boys to find packs of beads, a template, a peg board and a keyring chain, and then they came back and made their own Minecraft key ring using iron-together beads. It was a great (and quiet) activity the boys were happy to sit and do! The finished products looked great and they worked as a great party favor.


Another game which is always a hit is bingo! We found a great print-out for it online and the boys had fun playing.
The party was very enjoyable with all the boys and parents! Have a look at our Minecraft theme section to find all the products I used or pop in to see us and we will help you create your very own Minecraft party!